Your successful Happlicant onboarding starts right here
Use the following onboarding guide to help you get set up. If you need help, please book a call with our support experts.
1
Accessing your account
To log into your account, use this login page. We'd recommend bookmarking it for easy access. If you’ve been invited to join an existing account (as a client or team member), there’s no need to request an account. Simply use the invitation link sent by your account administrator.
Need help? Contact support at support@happlicant.com.
Don’t have an account yet? Request one here.
2
Onboarding overview
Onboarding steps
In the bottom right-hand corner of the onboarding page, you'll find a step-by-step guide. Click any step to jump directly to the right section in the app.
As you complete each step, it will be checked off automatically.

4-min demo video
Want a quick walkthrough? Watch the embedded video for a demo of how everything works.
Watch video

Leaving feedback
We'd love to capture any suggestions from you on how we can make our software better. You'll see a tab called "Leave Feedback" to the right of your screen. If you have any feedback you wish to share, feel free to send it to us via this tab!
Need some help?
Got questions? We're here for you! Reach out to us at support@happlicant.com
Or schedule some time with our customer success team for a 1-2-1 onboarding session with you or with anyone on your team.
3
Configuring your settings
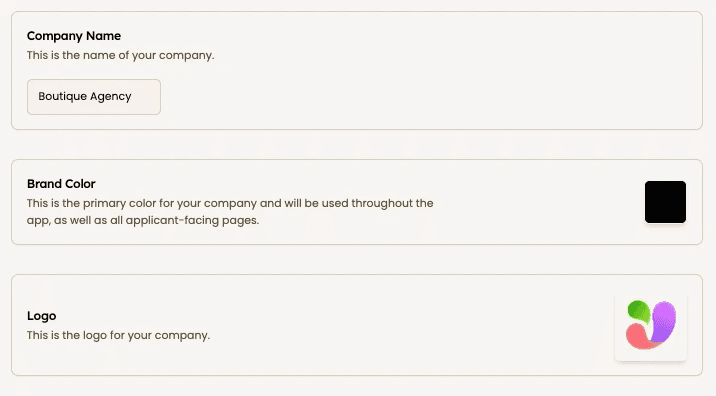
Set up your company profile
Head to the settings configuration page and in the "Company" tab add your: Company name, logo and main brand color. This color will be used across the platform, including in candidate-facing elements, like the application form and other components. You can use the exact Hex color by checking the checkbox.
You'll see Landing Page Settings below. These are the settings for your application form landing page Here you can:
Upload a background Image for the application page. Currently, this applies to all jobs/clients.
Set the background Image opacity and blur
Set your logo size and give it rounded corners if necessary
Select the title text color (black or white)

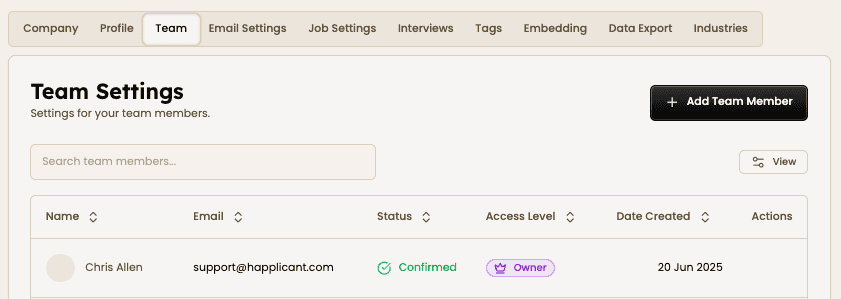
Configure team member access
In the Team tab, you can add team members. Simply click "Add Team Member," enter their name and email, and select their access level.
"Owner" gives full access whereas "Team Member" gives partial access. The team member will not be able to view client, placements and settings.
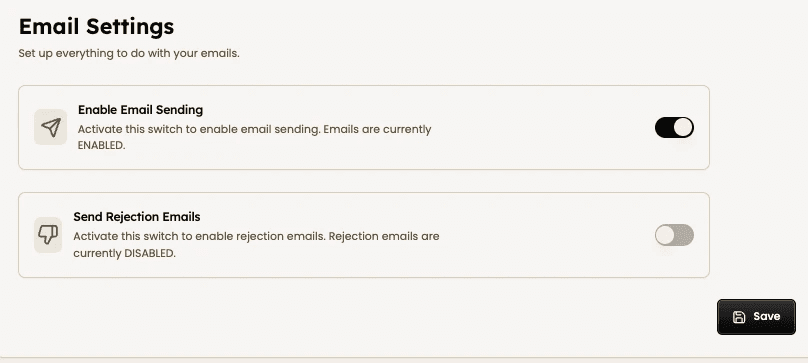
Set up email communication
In Email Settings toggle "Enable Email Sending" on to automate email sending when candidates. ⚠️ It's important to toggle this on otherwise emails won't be sent.
You can choose to toggle on or off rejection emails.
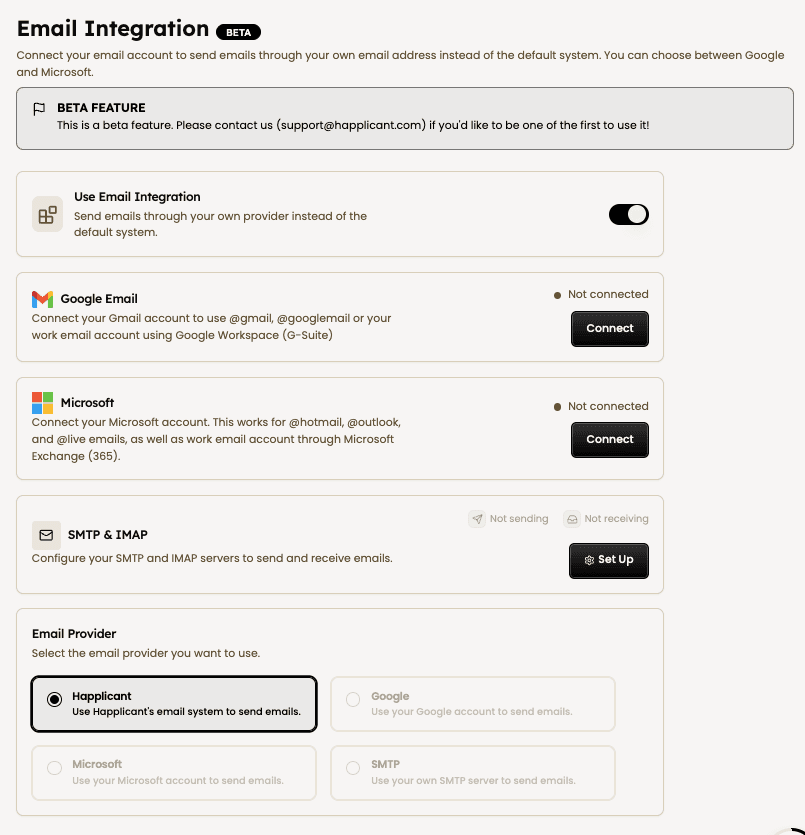
Email integration
You can easily connect your email account to send emails through your own agency email address. You can choose between Google, Microsoft and SMPT & IMAP.
⚠️ After setting up the connection, make sure you select either Google, Microsoft or SMTP below and then hit save.
Email templates
Also in Email Settings, you’ll find your standardized email templates:
Application Email
Rejection Email
Interview Email
By clicking "Edit Template" you can fully customize them to match your tone. Use the variables to ensure the email is personalized per candidate, job, recruiter, etc.
Please bear in mind that these templates are used for all new jobs but they can be edited for individual jobs in the Job Settings tab. See "Triggered actions" below for more details.
📣 Click the "Apply to All Existing and New Jobs" to override the changes you made to individual job application and rejection emails.


Customize your application form fields
In Job Settings, toggle on/off the following requirements for applicants to fill out on the application page. Please bear in mind that this configuration is used for all new jobs but they can be edited for individual jobs in the Application Settings tab per job.
Configurable fields:
Resume
Cover Letter
Phone Number
Location
LinkedIn
Choose whether the fields are mandatory or optional.

Customize job pipeline stage types
In Job Settings, you can customize the names and colors of your global pipeline stages. Any stages you have in jobs must be assigned to these stage types (or umbrella stages) to enable aggregation of stages for the dashboards, reports, and charts.

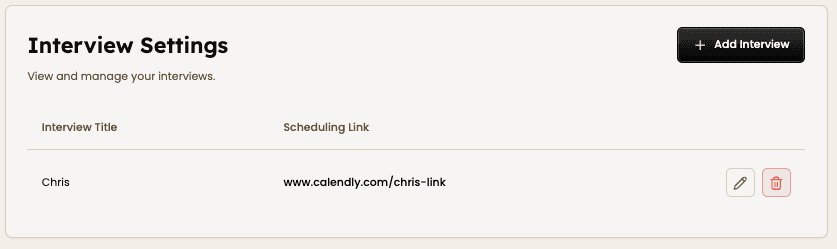
Interview scheduling links
In the Interviews tab, you can set up interview scheduling links—for yourself, your team members, or your clients. Just click Add Interview, then enter the name and link.
When setting up jobs, you can easily include these links in automated emails.
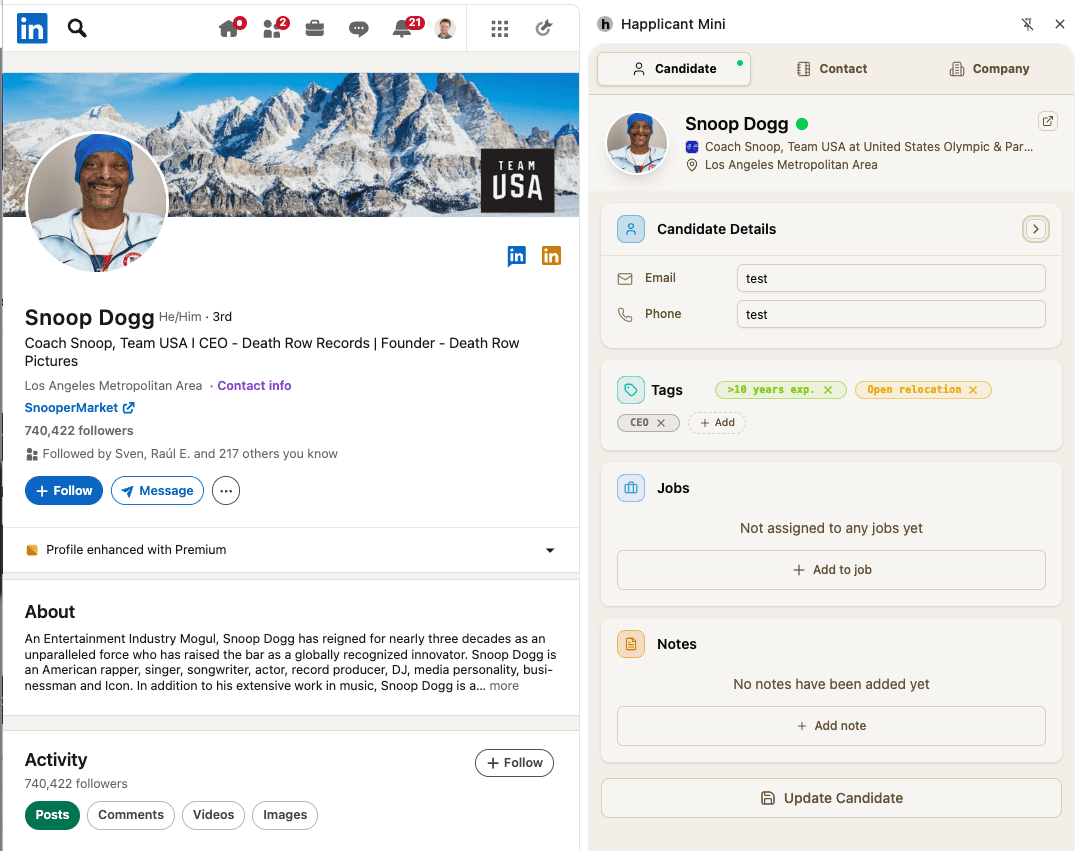
Custom tags
Tags are one of the best ways to search for candidates in your database. You can add, edit and delete custom tags from the Tags tab in settings. You can also create tags on candidate profile pages.
Apply colors to your tags to categorise accordingly. 💾 Don’t forget to hit save each time you make changes!

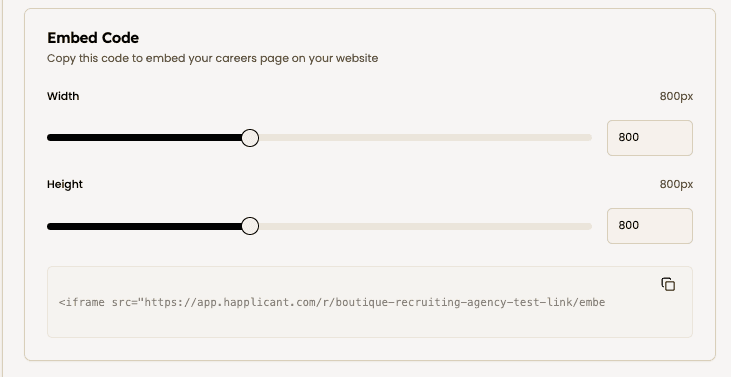
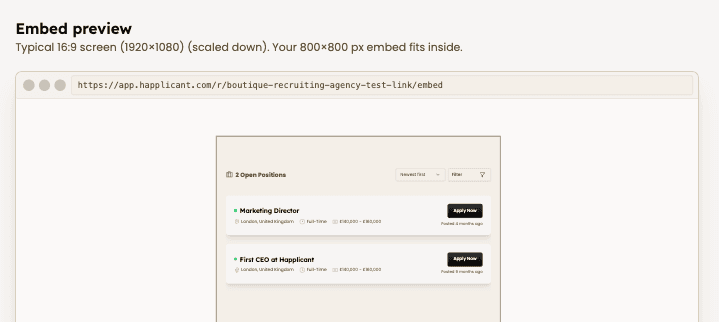
Embedding your open jobs
You can use Happlicant to easily embed all your open jobs on your website. This is perfect for when you want to showcase all open jobs on your website so anyone who wants to apply can very easily do so by clicking the Apply Now button.
To set this up, simply copy and paste the iframe code found in your Embedding tab.
Please let us know if you'd like a hand with this (free of charge).
4
Managing clients & leads
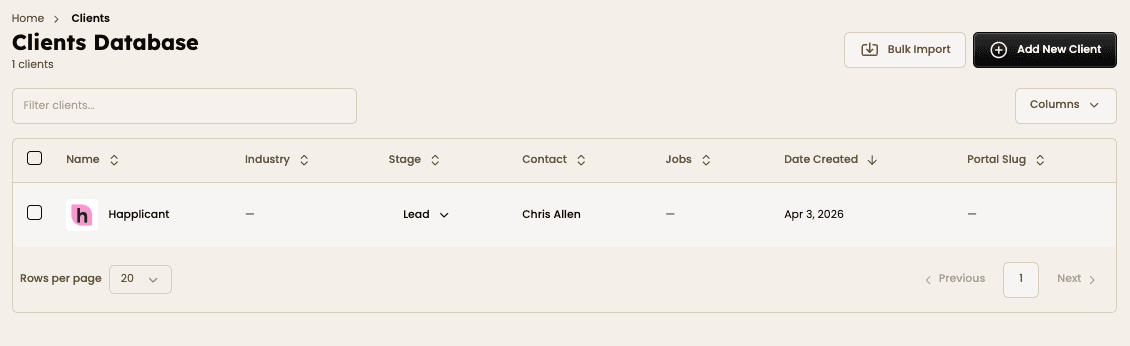
With Happlicant, you can manage clients and leads within the system. There are three ways to get company profiles into your database:
Adding companies and contacts manually
Using the LinkedIn Chrome Extension profile scraper
Using the bulk import tool
You can access your companies and contacts in the Clients dropdown in the sidebar, either in Companies and Contacts. There is also thePipeline view if you want to use custom stages to manage your business development pipeline.
Adding clients & leads
The easiest way much more convenient way to add clients or leads into your database is to use the LinkedIn Chrome extension. You can easily scrape company and client or lead profiles into your database at the click of a button. See a full tutorial on how to install and use the LinkedIn Chrome Extension.
You can also use the bulk import feature to bring your database into Happlicant. Just upload your Excel or CSV file. Match the columns and you're good to go!
If you prefer, you can also add clients or leads manually by pressing the Add New Client button. You'll need to enter a Client Name to get started. All other fields are optional.

Business development pipeline
Happlicant offers recruitment agencies the ability to manage leads within a pipeline. You can customize the state names by simply clicking on the titles. You can also delete stages by clicking the three dots and add new stages by scrolling to the end.

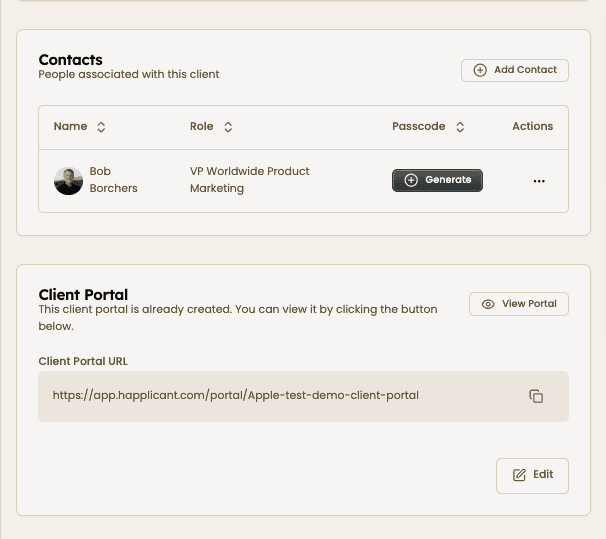
Client portal
Your client portal is a secure place for your clients to see all the jobs, candidates and any information you wish to share with them. First you will need to create a URL for the specific client's portal. The name of the URL must be unique.
Then you will need to generate a passcode for each of your contacts. As long as the URL and the passcode match, your clients can gain access.
For a complete walkthrough, visit the Client Portal how-to guide.

5
Managing jobs
Managing your jobs on Happlicant is a great way to keep your workflow organized. The good is that it's super easy to create and manage them.
Create your first job
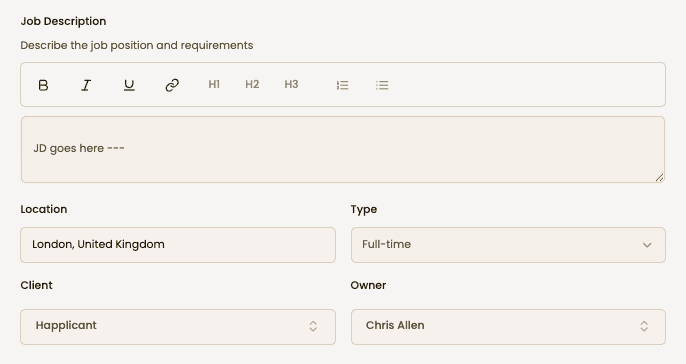
To create your first job, go to the All Jobs tab and click "Create Job." You'll see a short form. Fill in the required fields:
Job Name
Contract Type - Permanent, Temporary or Contract to hire
Job Description – this is the job description applicants would see if you share it
Location
Type
Client
Owner – you can assign jobs to different recruiters in your team
Salary Range (Optional) – It's worth inputting a salary even if you don't show it on the application page, as that way your projected revenue will be calculated automatically
Number of Hires – Choose how many placements you need to make for this job
Fee Type – Add your placement fixed fee / % fee to automatically track potential revenue
Job Status
Hit "Create Job" when ready—you’ll now see it listed in the All Jobs page.
⚠️ The only default fields that candidates will see on the application page are job name, job description, location and type. Candidates will not see client name!
📣 This will automatically create an application page for you, the URL for which you can find on the pipeline page, clicking Preview button!
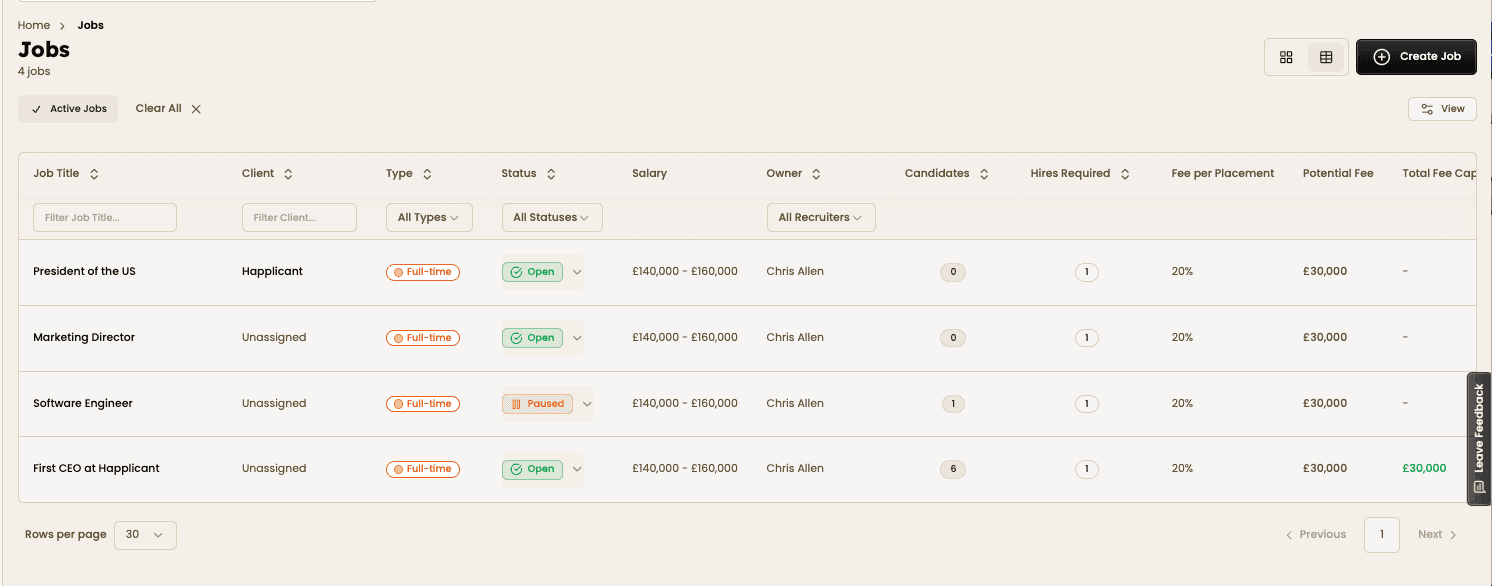
All jobs
You'll see all your jobs on the Jobs page. This is where you can see all jobs and important details at a glance.
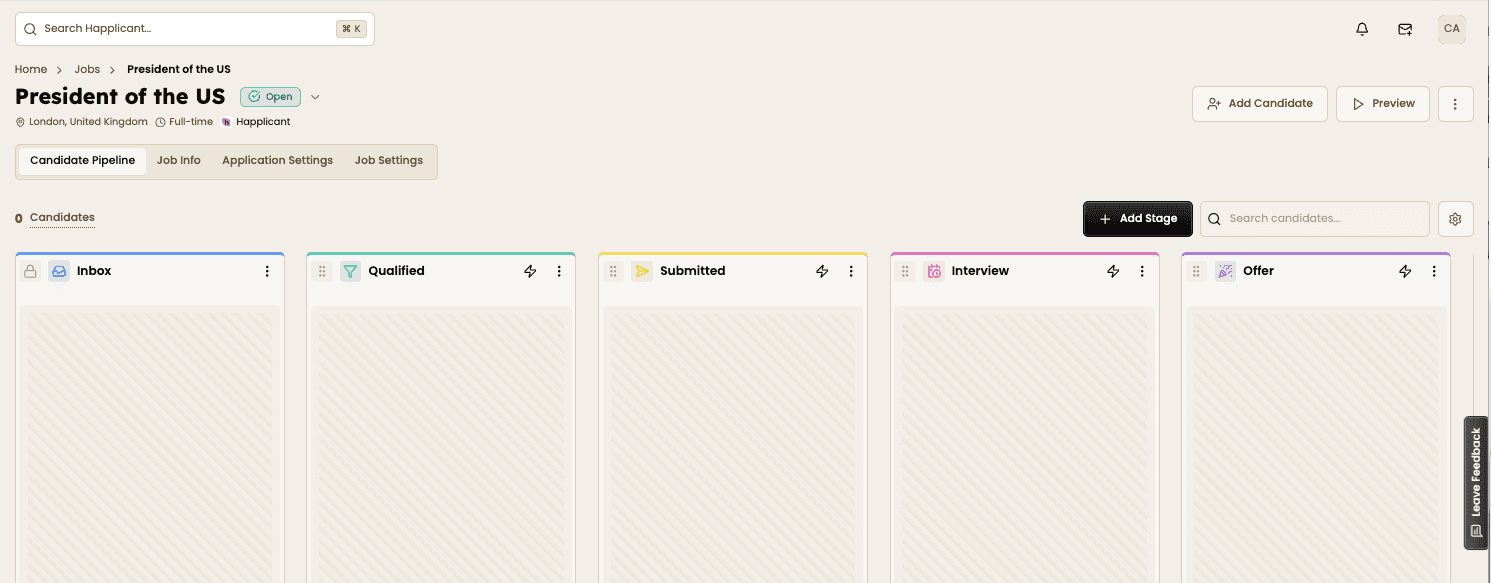
Configure your job pipeline
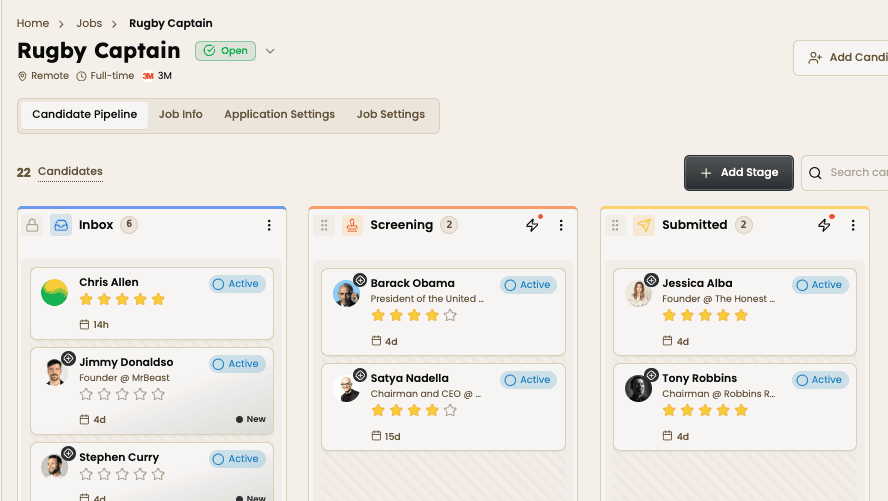
Once your job is created, it'll take you to the Kanban pipeline, which is essentially your ATS.
Each new job (unless using a template) starts with these default stages:
Inbox (locked at the beginning)
Screening
Interview
Offer
Placement (locked at the end)
You can customize these stages by changing names, icons, colors, umbrella stages and triggered actions (see below).
Add new stages by clicking the "Add Stage" button and drag and drop stages to create your ideal pipeline flow per job or even per client.
📣 Duplicate your jobs to save on admin time!
📣 Need less clutter? Click the left arrow to collapse a stage. Reopen it by clicking the chevron at the bottom.
Triggered actions
You can configure stages to trigger automated actions when you move candidates through the pipeline.
🚨 It's important to set this up before you start populating the pipeline with candidates to ensure emails are sent automatically!
Click the zap icon (⚡) to edit actions for a stage
Click "Add Action" and choose between:
Email to Candidate: These are custom emails that you will send to candidates that are moved into the specific stage. Use the editing feature to customize the email, using variables like candidate first name, last name, etc. These emails can be useful if you want to send a link to a form for the candidate to fill in or request permission to share their information to your client.
Email to Team Member: Similar to candidate above, these are custom emails that you will send to team members when candidates are moved into the specific stage.
Add Interview: Send an email requesting the candidate to schedule an interview email using your (or team members/ client's) scheduling link. Ensure you have added the scheduling links in the Interviews tab in your settings
Add Assessment (coming soon).
A red dot will appear over the zap icon once an action is configured and active. Any candidate you move into the stage, whether individually or in bulk will trigger an email to be sent.
Any stage can have assigned actions except for Inbox.
⚠️ Important: Review all automated actions (e.g., testing moving fake candidates through the stages) to ensure set up is correct.

Custom email templates
Happlicant offers custom email templates that you can edit and personalize using a range of variables. As mentioned above, you have different templates for application, interview, and rejection email templates in addition to custom emails you can configure per stage.
You can also edit the templates per job. This can be useful if you would like to tailor candidate communication for a particular job or client. Click on the Job Settings tab to find them.

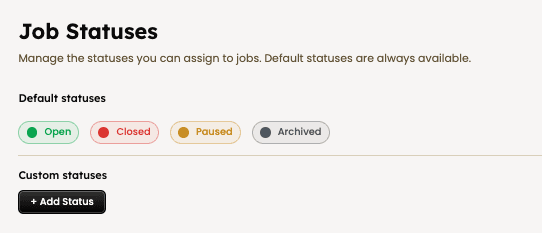
Job statuses
You have four default job statuses.
The default status is "Open". If the status is set to open, you will receive applications.
Use "Paused" when you want to temporarily pause applications
Use "Closed" once you've completed the job and no longer wish to receive applications
Use "Archived" when you want to remove it from your views
You can also create custom statuses on the Job Settings page.
Configure your application form
In the tab Application Settings, you can edit a specific job's default application fields. For the following fields you can toggle them on or off and make them mandatory or optional.
Resume
Cover letter
Phone number
Location
LinkedIn URL
If you want to edit the default application fields, you can find it in the Job Settings tab in Settings. ⚠️ this will only affect new jobs.
Add custom/ knockout questions in the "Knockout Questions" section at the bottom of the job's Application Settings tab. Add any question you'd like candidates to fill in.
You can choose between Text, Single Choice, Multiple Choice, Checkbox and Slider formats.

Preview & share application form
Click "Preview" (top-right) to preview your application form to double check the candidate experience.
📣 Tip: try a test application to check email notifications are working as expected.
Once you're ready to share your job, copy your application form link by click on the three dots (top-right) and selecting "Copy Invitation URL". Post this link in job ads, forums, and anywhere possible candidates might see it!

See a full overview of the application page and how to embed jobs on your website.
6
There are a number of ways for candidates to make their way into your database. In this section we'll explore three ways:
Adding candidates manually
Using the bulk import tool
Using the LinkedIn Chrome Extension profile scraper
Using the AI Resume Parsing tool
Through candidates applying to jobs
Add candidates manually
Add your candidates by hitting the + button on the sidebar or the Add New Candidate button on the Candidates page. You'll need to enter a candidate First Name, Last Name and Email to get started. The other fields are optional for now.
Bulk import candidates
If you already have a database of candidates, the easiest thing to do is bulk importing. All you need to do is upload your Excel or CSV file and match the columns.
First Name, Last Name and Email are all mandatory fields, the rest are optional. The system will automatically assign your fields to Happlicant standardized fields if it can. Once you're happy with the matching step, review and then save to finish the bulk importing.
📣 Please let us know if you need additional fields. We can create them for you (free of charge).

LinkedIn Chrome extension
One of the easiest ways to get candidates into your database is to scrape their LinkedIn profile using Happlicant's LinkedIn Chrome extension.
Install the extension in Google Chrome Store
Pin the extension to your Chrome browser
And start scraping! Click "Save to Happlicant" on any LinkedIn profile to add candidates to your database in a millisecond
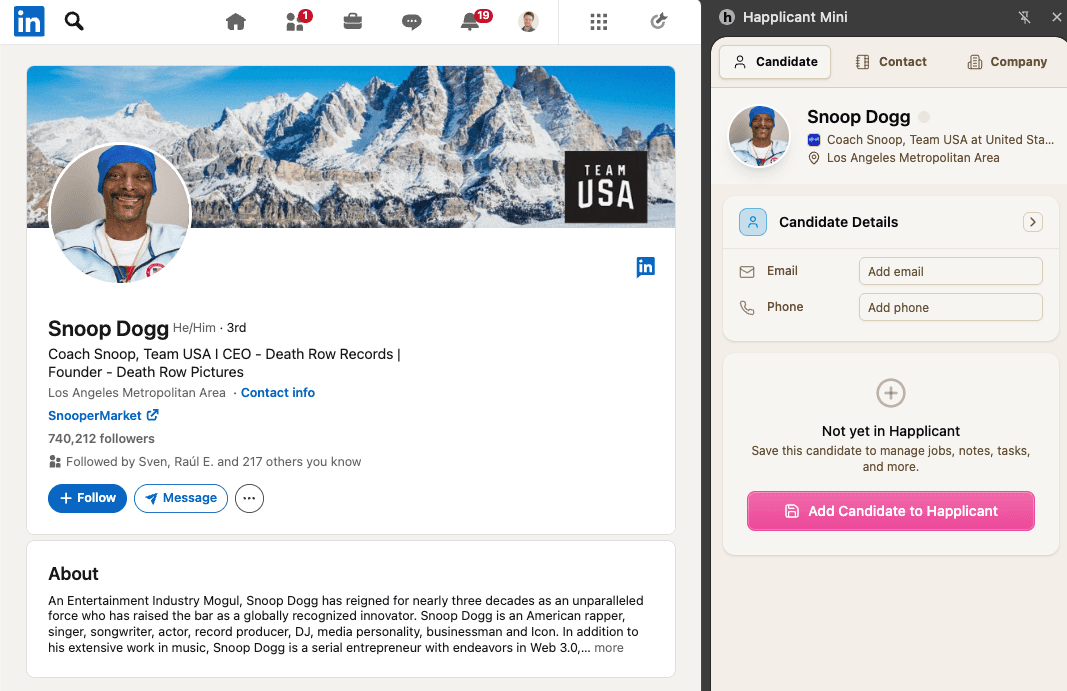
One of the best things about the Happlicant's LinkedIn Chrome extension is that you can also add tags, shortlist the candidate for jobs and add any notes, all from the extension itself.
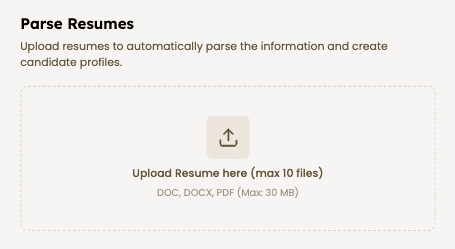
AI resume parsing tool
One of the easiest and best ways of getting candidates into your database is by using the AI resume parsing tool. You can add resumes in batches and it'll keep you informed on progress. You're not blocked so you can continue working in the meantime! Although it's pretty quick!
Applications
If you have chosen to accept applications, everyone who applies through your application forms will automatically become part of your candidate database as well as the inbox stage in the corresponding job.
Share your application form or add candidates to kick start the pipeline. If you've published/ shared an application form, you'll start to see candidate cards appear in the your Inbox stage.
7
Filtering candidates
Now that you have clients, jobs and candidates in the system, it's time to start adding them (or shortlisting them) to jobs.
Filtering your candidate database
You can search for relevant candidates in your database using the filters on the Candidates page and either individually add them to jobs, or bulk add them to jobs.
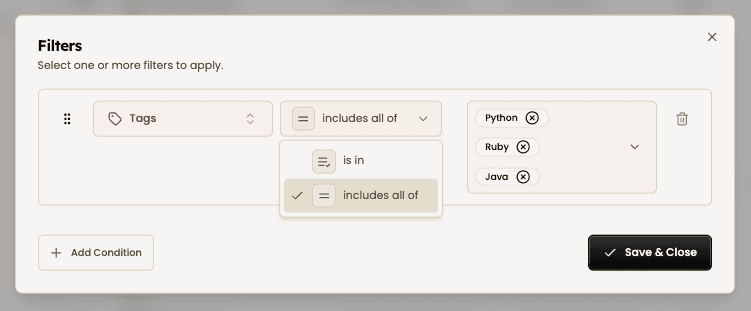
Filter your candidates using any of the following fields (more coming soon):
Custom tags
First name
Last name
Email
Date created
Job title
Current company
Location
Phone number
Proximity search
📣 Using Happlicant's LinkedIn Chrome Extension, the Resume Parser, or bulk importing you can easily auto-populate these fields.
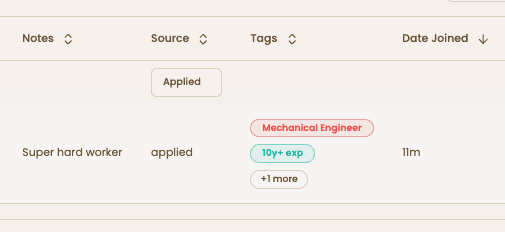
Custom tags
Custom tags one of the best ways to find candidates. It's super easy to both create and assign tags.
Proximity search
If location is important to your client, you could use proximity search. By adding an address, zip code/postcode, or even a city you can draw a radius of miles or kilometres and find candidates who fall within that location criteria.

Boolean search
Use Boolean search to pinpoint the right candidates in seconds. Combine keywords with operators like AND, OR, and NOT to narrow, expand, or refine results across your entire candidate database.
Your search query runs across:
• CV and resume content
• Supporting documents attached to candidate profiles
• Recruiter notes
• Tasks and activity history
• Candidate profile fields
• Data imported through the LinkedIn Chrome extension
This means you can surface candidates based on skills, technologies, experience, industries, or keywords mentioned anywhere in their profile.
See our dedicated Boolean how-to guide for more information.

Quick search
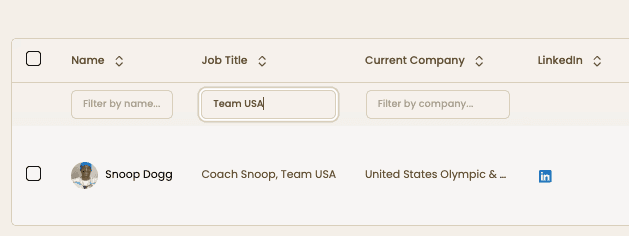
On the Candidates page you can very easily do quick searches by typing in name, job title, current company, etc.
There's also a Universal search bar right at the top, which you can use to find anything in the system.
Universal search
There's also a Universal search bar right at the top, which you can use to find anything in the system.
8
Managing job pipelines
Adding candidates to jobs
There are multiple ways to add candidates to jobs.
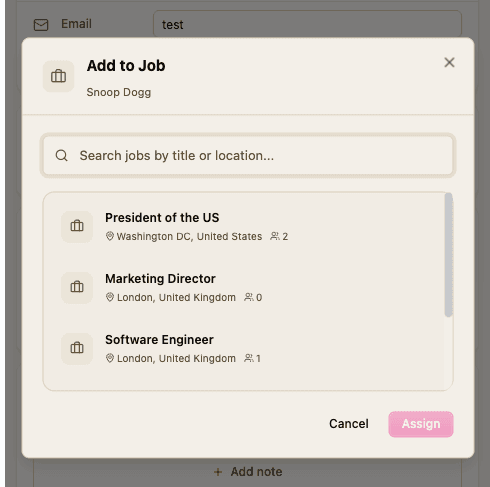
You can add a candidate to a job directly from their profile page by clicking the "Add to Job" button. You'll then see a popup that allows you to select the job you wish to invite them to.
You can also add a candidate to a job from the pipeline itself. Just click the "Add Candidate" button, search the name of the candidate and choose the Application Stage you wish to add them to.
From the LinkedIn Chrome extension
As mentioned above, you can also add candidates to jobs directly from the LinkedIn Chrome Extension.
You can add a candidate to a job directly from their profile page by clicking the "Add to Job" button. You'll then see a popup that allows you to select the job you wish to invite them to.
You can also add a candidate to a job from the pipeline itself. Just click the "Add Candidate" button, search the name of the candidate and choose the Application Stage you wish to add them to.
Checking applications
Whenever you have candidates apply to roles, they will be added into your candidates database and the specific job pipeline they applied to.
You can find all candidates who have applied in your database by selecting source "applied".
Or you can check very quickly and easily for new applicants on your Dashboard in the section Latest Applications.

When you click on an application, you'll instantly see the applicant's complete profile pop up showing all the candidate's details along with the resume and answers to custom questions and the cover letter (if required).
All your applications will also feature in the Inbox stage of the corresponding job pipeline, alongside anyone you've also added or shortlisted to a job.
Added candidates display a cross-hairs icon above their initials whereas applicants do not show an icon.
Processing candidates
Once candidates start to populate on your board, you can take the following actions:
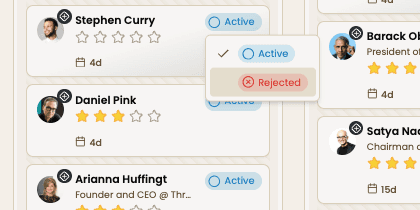
Changing a candidate's status
To change candidate status, simply click the status pill on the candidate card to update their status:
Active (default) – Candidate actively being considered
Rejected – ⚠️ Triggers an automatic rejection email, if turned on
Moving candidates through pipelines
To move candidates to another stage simply drag and drop candidates between stages.
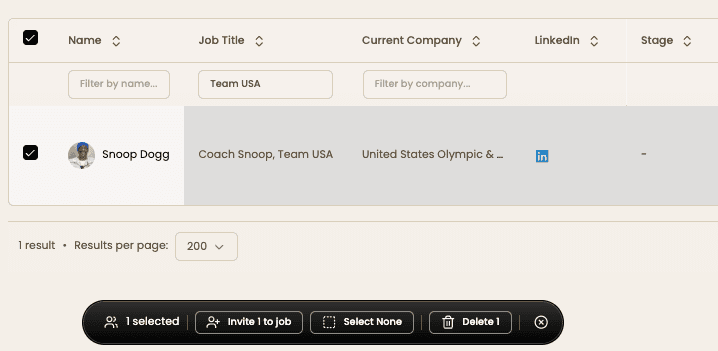
You can also perform bulk actions by either selecting candidates individually, clicking their initials in the circle, or selecting all candidates in a stage by clicking the three dots in the top-right corner.
Pressing the "Select All" button next to the "Bulk Actions" button will select all candidates on your board. To unselect all, click "Select All" and then "Select None".
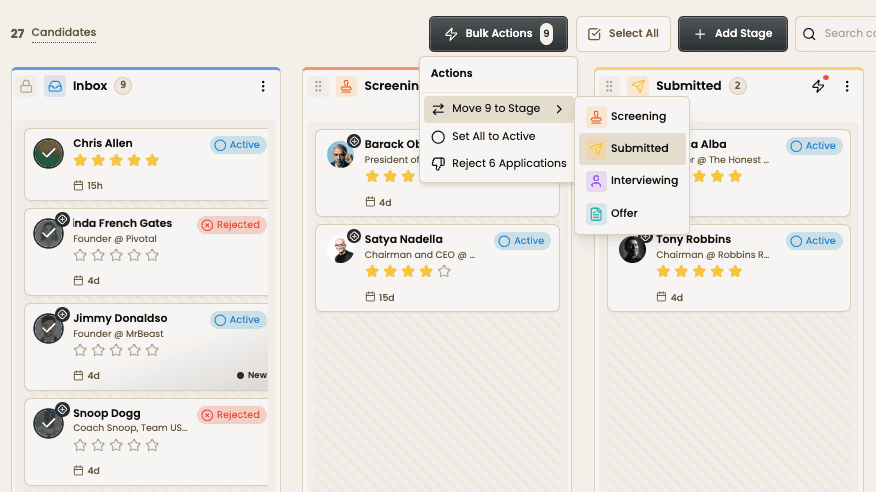
Whenever you change more than one candidate’s stage or status, a confirmation popup will appear before the action is applied—preventing accidental changes and unwanted emails to be sent.
Rating candidates
Rating candidates is also easy, just click the star icon on a candidate card to assign a rating. This can be edited anytime.
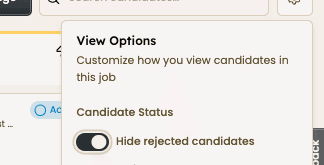
Hide rejected candidates
If you prefer a cleaner pipeline, you can hide rejected candidates by click the gear icon in Kanban and toggling on "Hide rejected applications".
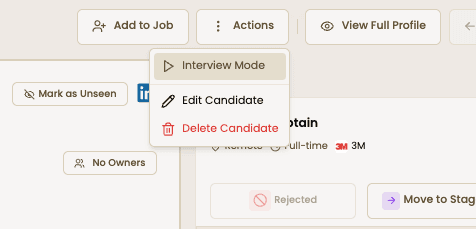
Interview mode
To make screening candidates easier, we created Interview Mode. Go to Actions in the top right-hand corner of the screen, and select "Interview Mode". You can switch between tabs (e.g., candidate info, resume, etc.) and see the critical information on your candidates, all while you take notes.
Adjust the Notes section height and width if needed and easily scroll through all your previous notes on the candidate to ensure you don't forget a thing!
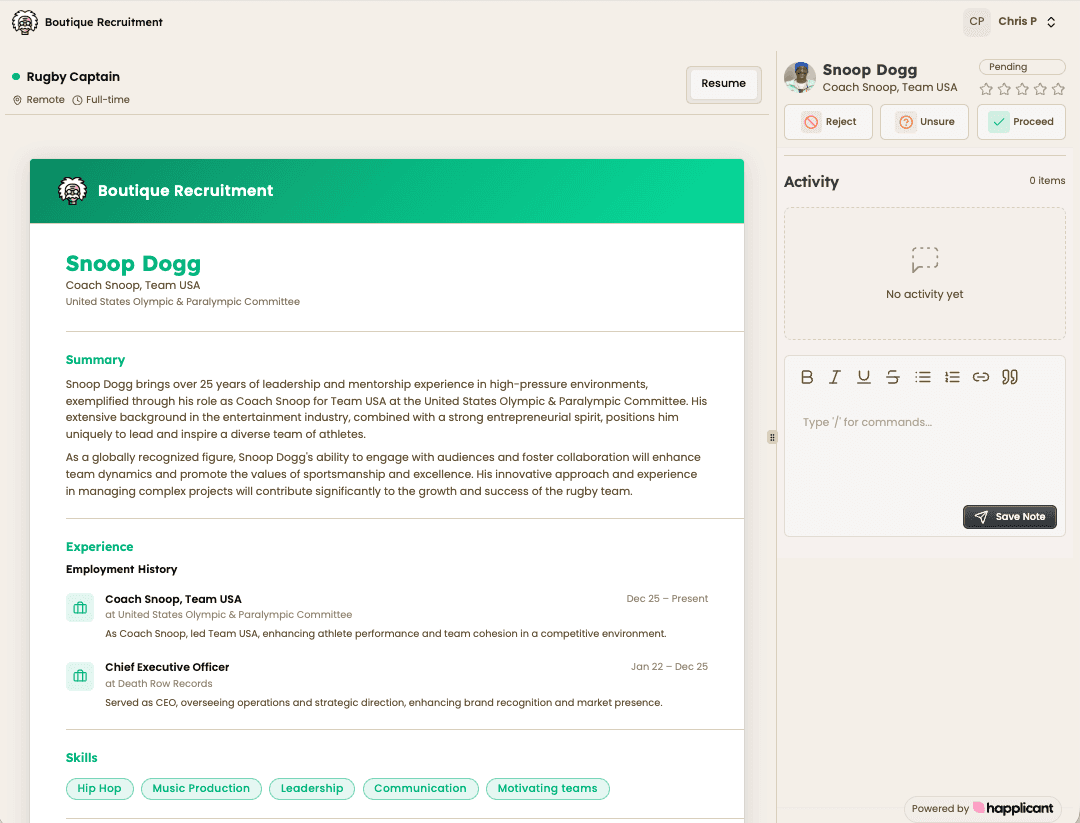
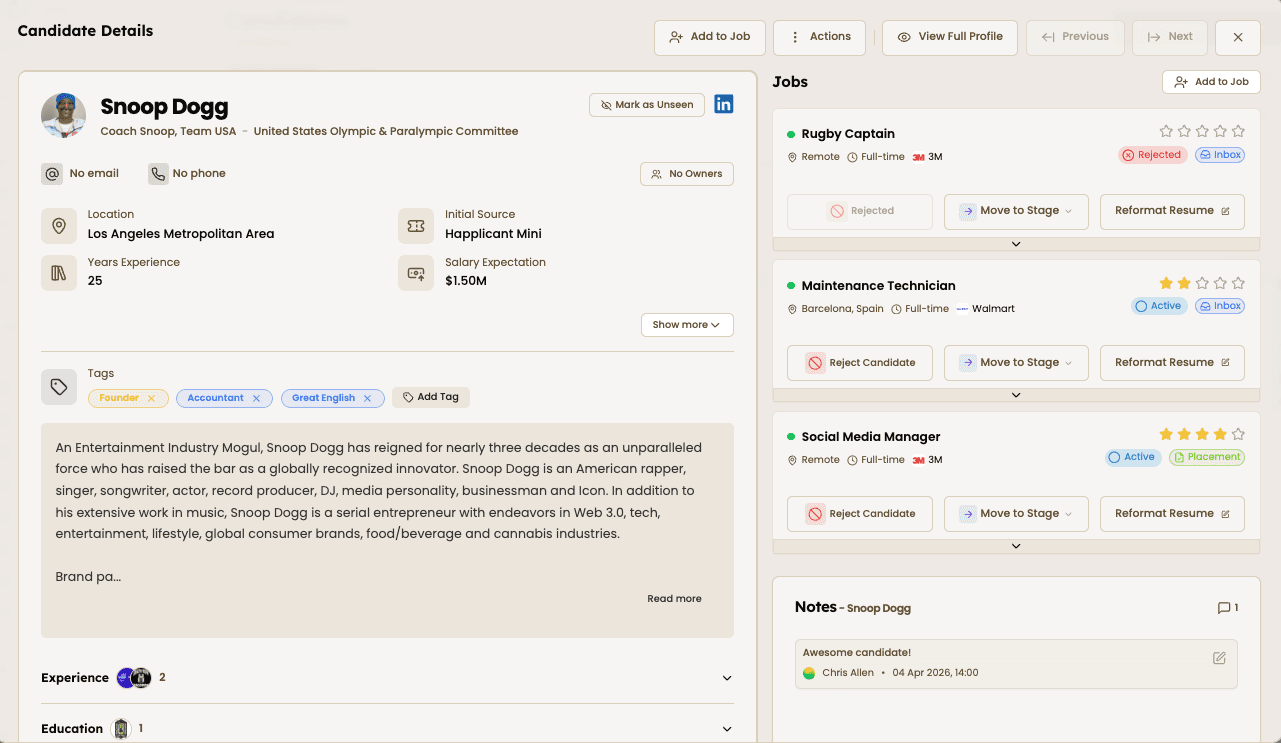
Candidate profile page
To view a candidate's full profile, just click their name anywhere within the app.
You'll then see a popup containing comprehensive overview of the information you have for the candidate, including jobs they're being considered for, all the events and notes associated with the candidate, the resumes, etc.
Read a comprehensive overview of the Candidate Profile in this how-to guide.
Reformatted resume builder
For many recruiters, creating a reformatted or a branded resume is a huge time-zapper. That's why we built an AI-powered way for you to automate reformatting resumes.
Inside your candidate's profile, you'll see a button called Reformat Resume. Once you click that, you'll get taken

Double check the candidate and the role is correct and hit the Generate Resume button.
Taking the candidate profile, the job description, all your notes, the resume reformatting tool will automatically generate a branded resume for you to share with your client.

Get a full tutorial on how to use the resume reformatting tool here.
9